A ceiling-hung cubicle is only as reliable as the structure above it, the measurements below it, and the sequence used to assemble it. By the end, you will know how to verify the support, prepare the room, install each component, and specify the materials and clearances that prevent costly rework.
Key takeaways
- Never attach cubicle loads to an unsupported suspended ceiling grid.
- Confirm slab, steel, anchor capacity, and embedment before ordering panels.
- Coordinate plumbing, electrical, ventilation, and access openings with shop drawings.
- Install headrail, panels, pilasters, doors, and hardware in the specified sequence.
Verify the ceiling support before ordering the cubicles
A suspended ceiling grid cannot carry a ceiling-hung toilet cubicle partition unless an engineer has designed reinforcement for it. The load must transfer through hangers, threaded rods, carriers, or a structural headrail into a reinforced concrete slab, structural steel, or another approved support with documented anchor capacity and embedment.
Before ordering a cw ceiling hung ss cubicle for installation, obtain a ceiling survey and confirm:
- The slab or steel frame can resist the concentrated and eccentric loads from panels, pilasters, doors, and user-applied forces. If it cannot, add structural steel or a secondary support frame, anchor to the slab above, or select a floor-supported system. Longer suspension rods do not strengthen an inadequate ceiling.
- The finished ceiling level, allowable ceiling tolerance, hanger spacing, anchor type, embedment depth, and permitted load appear on the supplier’s system-specific drawings. “CW” is not a universal installation standard.
- The specification states the privacy gap, panel-to-floor clearance, floor-to-ceiling or ceiling-hung arrangement, stainless-steel grade and finish, corrosion environment, and door hardware. Salt-laden, wet, or chemical-cleaning areas need suitable corrosion resistance.
- The compartment type and accessibility standard are identified before fabrication. Under the 2010 ADA Standards, a wheelchair compartment is at least 60 inches wide, with minimum depth of 59 inches for a wall-hung water closet or 56 inches for a floor-mounted model.
- The toilet cubicle partition is compared against a floor-supported system: the latter transfers loads through pilasters and feet into the floor, while a ceiling-hung system leaves the floor clear but makes overhead structure, suspension alignment, and ceiling tolerance critical.
Measure the finished room and coordinate every service opening
Record finished dimensions, not nominal room sizes, before releasing fabrication. A few millimetres lost at the floor, walls, or ceiling can shift pilasters, reduce door clearance, and leave plumbing inaccessible.
Before fabrication and installation, confirm:
- Finished floor level, finished ceiling elevation, ceiling tolerance, wall positions, room length and width, partition returns, cubicle widths, and panel-to-floor or privacy gaps.
- Door swing, door clear width, toilet centreline, grab-bar locations, turning space, and the required accessibility standard for each compartment.
- Plumbing rough-ins and penetrations for water closets, flush valves, concealed cisterns, shutoff valves, floor drains, cleanouts, and supply lines.
- Service clearances behind removable panels; coordinate these locations with the plumbing contractor before fixing any panel permanently.
- Structural fixing points, ceiling support locations, lighting, sprinklers, exhaust grilles, ducts, and other obstructions that could clash with the headrail or hangers.
Accessible layouts must be identified before shop drawings are approved:
| Compartment type | Minimum dimensions to coordinate | Additional checks |
|---|---|---|
| Wheelchair-accessible, wall-hung water closet | 60 in wide; 59 in deep | Door swing, grab bars, centreline, clear floor space |
| Wheelchair-accessible, floor-mounted water closet | 60 in wide; 56 in deep | Door swing, grab bars, centreline, clear floor space |
| Ambulatory-accessible | 35–37 in wide; 60 in deep | Side- and rear-wall grab bars |
A complete-looking washroom toilet cubicle partition is still defective if a technician must dismantle fixed panels to reach a valve, cleanout, or concealed cistern. Capture every opening and maintenance zone on the coordinated shop drawing before materials are cut.
Install the headrail, panels, pilasters, doors, and hardware in sequence
Use the supplier’s system drawings for a cw ceiling hung ss cubicle for installation; CW is a product designation, not a universal fixing standard. Confirm the carrier, threaded rods, hangers, anchors, spacing, and approved ceiling load before drilling. Never suspend the partition from ceiling tiles or an unreinforced grid.
1. Mark the finished-floor centerlines for every partition, return, pilaster, and door opening. Check cubicle widths, accessible-cubicle clearances, wall offsets, and service openings against the approved layout.
2. Prepare the structural ceiling at each fixing point. Install the specified anchors into the reinforced slab or approved steel support, then fit and level the headrail or overhead carrier. A misaligned carrier will create uneven door gaps later.
3. Fix the end walls and pilasters to their marked positions, keeping each member plumb. Tighten connections only after checking the required panel-to-floor clearance and continuous privacy lines.
4. Hang the intermediate panels from the carrier and connect them to the pilasters. Align faces, joints, and returns before final tightening; keep removable panels clear of flush valves, cleanouts, shutoff valves, and concealed cistern access.
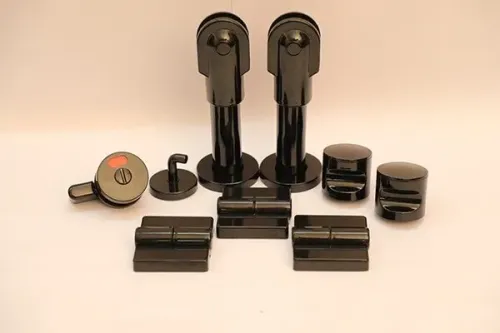
5. Install each door after the overhead system and fixed panels are stable. Fit hinges first, then the door, keeper, coat hook, indicator bolt, pull, and other specified hardware. Check that the door swings without striking sanitary fittings.
6. Make the final plumb, level, reveal, and latch adjustments. Tighten all fixings, remove protective film without scratching stainless steel, and operate every door and lock through several cycles before handover.
Specify the stainless steel, anchors, hardware, and protection details
Treat “CW” as a manufacturer’s system code, not a universal installation standard or a steel grade. Ask the toilet cubicle supplier for system-specific drawings showing the carrier, headrail, hanger rods, anchor pattern, allowable load, and fixing substrate. A suspended-ceiling grid is not an acceptable structural support unless separately reinforced and approved.
Write these items into the purchase specification:
- Stainless-steel grade: 304 for ordinary interior conditions, or 316 where coastal air, chlorides, aggressive cleaners, or continuous wet-room exposure increase corrosion risk.
- Material reference: ASTM A240/A240M where applicable, plus sheet thickness, surface finish, edge treatment, and whether panels are solid, formed, or honeycomb.
- Anchors: substrate-approved type, diameter, embedment depth, spacing, and design load; do not accept “suitable anchors” without figures.
- Hardware: corrosion-compatible hinges, locks, fasteners, and washers, with the specified finish and replacement access.
- Isolation: separate stainless steel from carbon steel, aluminium, wet cement, and other incompatible metals where contact could create staining or galvanic corrosion.
Use clean stainless-only tools for cutting and drilling. Keep carbon-steel filings, cement dust, grout, adhesive, and alkaline cleaners off the panels; they can permanently mark the surface. Remove protective film according to the installation instructions, before uncontrolled exposure to sunlight, heat, or construction contamination.
Wipe fingerprints and residue with a clean, non-abrasive cloth and approved cleaner before handover.
Use shop drawings and final checks to control the installation
Do not let installers drill final anchors from a catalogue image. “CW” is a system designation, not a universal installation standard; require system-specific shop drawings from the restroom cubicle manufacturer before fabrication and final fixing.
If Cubicle World industries Pvt Ltd is supplying the system, its submittal should still be checked against the project specification and site conditions.
1. Require drawings showing plan dimensions, elevations, finished floor and ceiling levels, panel and door thicknesses, headrail or carrier details, hanger spacing, ceiling support points, substrate, anchor type, embedment, hardware, finish, material grade, privacy gaps, and panel-to-floor clearance.
2. Confirm the compartment type before approval. For a wheelchair-accessible compartment under the 2010 ADA Standards, check the 60-inch minimum width, 59-inch minimum depth with a wall-hung water closet or 56 inches with a floor-mounted water closet, door swing, grab bars, toilet centreline, and clear floor space.
Do not accept an ambulatory layout as a substitute.
3. Mark clashes on the drawings before fixing: lights, sprinklers, exhaust grilles, ducts, flush valves, concealed cisterns, shutoff valves, cleanouts, and removable service panels. Make the toilet cubicle supplier coordinate the washroom toilet cubicle partition with the plumbing contractor.
4. At handover, check plumb panels, level headrails, uniform door gaps, secure hinges and locks, anchor tightness, undamaged finishes, stable doors, unobstructed access, and working maintenance clearances. Record approved drawings, anchor details, finish grade, and hardware schedule.
Related product
 | Restroom Cubicles Add classic wings to your restrooms Innovation with simplicity and splendor, Greenlam Sturdo presents you Classique Wings, a sparkling new assortment... View product → |
Frequently asked questions
Can a suspended ceiling grid support a ceiling-hung toilet cubicle partition?
No. Transfer the load through engineered hangers, threaded rods, carriers, or a structural headrail into reinforced concrete, structural steel, or another approved support.
What should you verify before ordering ceiling-hung stainless steel cubicles?
Verify the finished ceiling, structural support, anchor capacity, embedment depth, hanger locations, and the clearances needed for services and doors.
Which installation sequence should you follow?
Install the headrail or support system first, then panels, pilasters, doors, and hardware. Follow the approved shop drawings for alignment and fixing points.
What service openings must be coordinated before installation?
Coordinate plumbing, electrical, ventilation, fire protection, lighting, access panels, and cleaning clearances against the finished room dimensions.